// GUIDE // 3D printing city models with Cura
STL files created by 3dcityloader.com are perfect for 3D printing. Here we explain the procedure and give a few tips for impressive results.
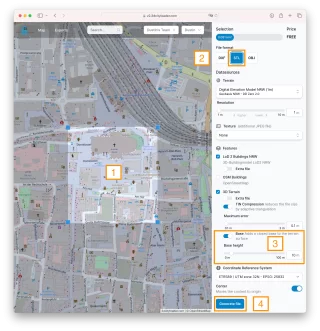
Create and download STL file
Open our App, search for the the desired location and adjust the selection by moving the blue corner points and zooming/moving the map. We recommend an area of less than 0.5 km² for printing on standard printers, otherwise the scale will be too small.
Select 'STL' as file format, this is best suited for import into Cura and other common slicers.
(optional ) Adjust the 'base height' of the base that ist added under the terrain surface or keep the default value.
Leave all other settings unchanged. The best options are selected automatically. Start the generation by clicking on 'Generate file' or 'Create preview' if it is a chargeable section.
After a few seconds you will be shown a preview of the file. If you are satisfied with the result, you can save the file by clicking on 'Download file'. If it is a paid excerpt, this is only possible after payment.
The download is an ZIP archive with multiple files you need to extract. For the next step, the file with the .stl extension is required.
Import STL file into Cura
In this example, Ultimaker Cura is used as slicer, but other programs can also be used. The procedure may differ slightly.
Open Ultimaker Cura
Click on the folder icon to open the import dialog and select the file you downloaded in the previous step.
Scale and position the file according to your preferences. If you want to reduce the height of the base you can move the model on the Z-axis a bit below the printing plate.
Adjust the print settings to the printer and material as you normally would.
Start slicing and printing.
Tips and Tricks
Support structures are usually not needed.
To avoid wrapping at the corners of the model, print with 'Brim'. In Cura setting 'Build Plate Adhesion Type'.
The base (thickness of the terrain) can be reduced by moving the model in Cura on the Z-axis a bit below the printing plate.
Would you like to print in multiple colours? Use the 'separate file' option for the terrain and you will get separate files for buildings and terrain. You can import these one after the other and then set different colours.
You do not want to print yourself?
We will be happy to supply you with ready-printed city models. Please contact us for an individual offer. The following features are possible:
Multi-coloured prints to highlight certain buildings.
Insertion of new buildings that you provide as CAD models.